Creating an Interaction System, Interactable Objects, and a Visual Indicator System for Interactions
- Watchman

- Aug 8, 2025
- 7 min read
Updated: Aug 11, 2025
In this guide we are going to cover how to create an interaction system that allows the player to interact with objects in the level. We are going to expand on this by additionally creating a Visual Indicator System that highlights items with a white outline dependent on the distance the player is from the interactable item and if the item is ultimately interactable.
To start this, we want to set up three things, an object we want to be interactable, a blueprint interface to communicate between our object and our player, and a trace to detect objects from our player. The first thing we are going to tackle is the interactable object. For this example, we are going to use a sword.
Creating an Interactable Object
In our Blueprints folder we want to create a new folder and name it "Interactables", within our "Interactables" folder we want to create another folder and name it "Weapons". This is where we are going to store our interactable sword item. Once created we can right click and create a new Actor, this actor's name is going to be "BP_TestSword". Open up our sword actor and we can assign it a static mesh. I am going to be using the "SM_Wep_Broadsword_01" from the Polygon Knights Pack.
Creating a Blueprint Interface for Interactions
Now in our Blueprints folder we want to create a new folder for our Interfaces, which we will appropriately name "Interfaces". Inside we can right click and under Blueprint, we can select a Blueprint Interface. I will name this interface "BPI_Interact".
Inside of our Interface we want to create two functions. Our first function I will name "Interact", and the only thing I am going to add to this function is an input for our execute node. I want to name it "Character Picking Up" and for the type I want to search for BP Third Person Character (or whatever character blueprint you are using) and select an object reference. The second function I want to create is "Can Receive Trace" and I want to add another input, but this time I want to name it "Can Interact" and set the variable type to a Boolean.
The last thing we need to do before moving on is to return to our Interactable Item and in the Class Settings, we want to add an interface, and search for BPI_Interact.

Creating an Interaction Trace from the Player
Inside of our character blueprint (BP_ThirdPersonCharacter in this example) I want to find Event BeginPlay. From the event if it is already in use, I will create a sequence. Personally, I use the BeginPlay event to Add Input Mapping for my character so even if this is a brand-new project, it will be in use. So either from the sequence or the event execute we can get "Set Timer by Function Name". The Function Name is going to be "Create Interaction Trace", out Time is going to be set to 0.01, and we are going to set Looping as True. From this we can promote our result to a variable and name it "Interaction Timer". I am going to highlight and comment this "Create Interaction Trace Timer".
From here I can right click and "Add Custom Event". I want to name this event Create Interaction Trace to match the Function Name in the Set Timer by Function Name we just created.
Now we need to create a custom function that our Create Interaction Trace Event will utilize. To do that we can click the add item next to functions and name the function "Interaction Trace".
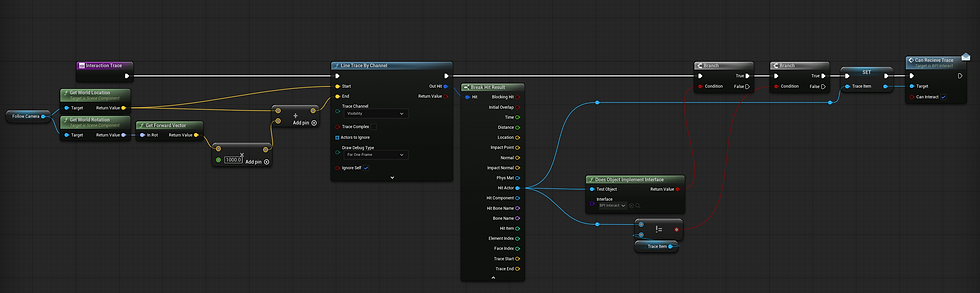
To start this function, we are going to drag from the function execute and get a "Line Trace by Channel". Then we are going to grab our Follow Camera component and drag and drop that into our Event Graph. From it we can get it's World Location and use that as our start location. Next, we can get our Follow Camera's World Rotation, then from that its Forward Vector, multiply that by a float of 1000 (to do this you will need to right click on the vector variable and convert it to a single precision float), and add that result to the World Location vector we used for the start location. This result will be our end location.
Now after our trace we want to drag from our Out Hit and break our Hit Result. Let's create two branches from our trace execute. The first is going to be getting our Hit Actor from our Hit Result then getting the "Does Object Implement Interface" node. We can set our Interface as our BPI_Interact. This will be our first condition for our first branch, that our Hit Actor has the BPI Interface. From our Hit Actor promote the result into a variable and name it Trace Actor. This variable will keep track of the actor that we are currently looking at. For our second branch we are going to check if our Hit Actor is not equal to our Trace Item. This will keep us from constantly setting our Trace Item on the same actor over and over. If both branches are true then we are going to get our Can Receive Trace function from our BPI Interface by dragging from the Trace Item, then setting the Can Interact variable to True.
Let's navigate back to our Event Graph and we can drag from our Create Interaction Trace Event and get our new Interaction Trace Function. Highlight both and comment "Create Interaction Trace Event".
Creating an Input Action and Interact Blueprint Action
Now we need to create an Interact Input Action. In your Content folder open our Input folder and create a new Input Action; name it "IA_Interact". Then in your Input Mapping Context we want to create a new mapping for our Input Action and for this action I will map it to the E key.
Now we can head back to our character blueprint (BP_ThirdPersonCharacter) and we can right click in our event graph and search for IA_Interact. Now we can get our Trace Item variable and drag that next to our IA_Interact. Right click on our Trace Item variable and convert to a validated get. If it is valid then we can drag from our Trace Item and get our Interact function from our Blueprint Interface. Our Target variable is going to be the trace item, and our Character Picking Up is going to be a reference to self. Let's highlight this and comment, "Interact Action".

Now that we have set up the core of the system what we need to do now is adjust our item to do a few things. We are going to have to set an invisible radius on our object that detects when the player is within it, while the player is within it, we are going to outline our interactable item using a custom material. If the player leaves this radius, then we are going to remove our outline material. Let's start by creating the outline material.
Creating an Outline Material
In our Content folder we are going to create a folder and name it "Materials". Inside of our new folder we are going to right click and select Material to create a new material and name it "M_Outline". Let's open our material and inside we are going to set our Material Domain to Surface, Blend Mode to Masked, Shading Model to Unlit, and Two Sided to True in the details. Then we can drag from our Emissive Color and get a Parameter and set all values to 1. Right click and get a TwoSidedSign and from that get a OneMinus and plug that into our Opacity Mask. Then right click and get a VertexNormalWS and multiply 1.25. You can right click on this pin and promote it to a parameter. We can name this parameter Thickness and give it a value of 1.25. This is going to be our World Position Offset.

Creating an Interaction Radius and Assigning our Outline Material
Navigate back to our interactable item and add a sphere collision component to our interactable item actor. Set the radius to 225 and ensure that the collision is OverlapAllDynamic. Now right click on our PickupRadius and add event, then find the "On Component Begin Overlap" event. From the execute, we are going to Cast to our BP_ThirdPersonCharacter and connect our Other Actor with our Object input then we want to get the "Set Overlay Material" node and our target is going to be our Weapon Mesh. Set the New Overlay Material as "M_Outline". Now we need an "On Component End Overlap" event where we are going to repeat the same information but this time, we are setting the overlap material as None.

Creating a Function for our Interaction
The last thing we need to do is tell the game what we want to do when we interact with our item. In this example since we are using a sword, I'll demonstrate how to take the item and attach it to the Player Character. To do this we can navigate to our character skeleton. Inside of the character skeleton I can find my Hips bone and right click then add socket. I'll name this socket SwordUnequipped, then I'll add a preview asset. I can move the socket to position the preview asset how I want to object to appear. In this case I want it to be placed on my characters left hip. Once I have it positioned, I can save and navigate back to my item.

Here I can create a new function and name it "Attach to Player". I'll add two inputs, one for "Socket Name" which I will set as a Name type variable and then another which ill name "Character Picking Up" and set that as a Character type object reference variable. From the execute I will drag off and find "Attach Component to Component". Our Weapon Mesh is going to be our target, from our character picking up we can "Get Mesh" and that will be our Parent, and our Socket Name will be our Socket Name. We want to set our Rules to Snap to Target and False to Weld Simulated Bodies. From our execute after Attach Component to Component we can once more set our Overlay Material as none to ensure we are no longer highlighting our interactable object.

Now in our Event Graph we can find our Event Interact from our BPI Interact and call our Attach to Player function we just created. Our Character picking up will match our Character Picking Up and we can create a new Variable named SwordUnequipped as a name type variable and set that as the Socket Name. In the details panel of the Name Variable ensure that the Default Value matches that of your Socket Name exactly.


Now when we play our game and we interact with our item it will attach to our character, additionally when we enter and exit the Pickup Radius it will turn on and off the highlight indicator for our player.
To ensure that the sword collision doesn't interfere with the character make sure to set the collision enabled to Query and Physics, Object type to World Dynamic, and Set all Responses to Block aside from Camera and Pawn.


Comments