How to Import Synty Assets into your Unreal Engine Project
- Watchman

- Aug 6, 2025
- 3 min read
In this quick guide I am going to cover importing Synty Assets from the Synty Store into your Unreal Engine Project.
Downloading Synty Assets
First things first we can navigate to the Synty Store and locate the assets that you purchased. In this example we are going to be using the Polygon - Spy Kit. You can navigate to the assets webpage and look for the "You already own this pack!" button or you can head to your download library and find the pack there.


From here we can find the download window for our assets, and we want to choose the Unreal Engine version.

Once downloaded we can look for our files in our download location of choice. Right click on our zipped folder and Extract All. Now open your extracted folder and find the Unreal Engine Project file. Double click to open and select the version of the Engine you would like to open the project in.

Migrating Synty Assets from the Downloaded Project to your Own Project
Inside the Engine we can open our content browser and in the main menu we can find our asset folder. Right click then select migrate.
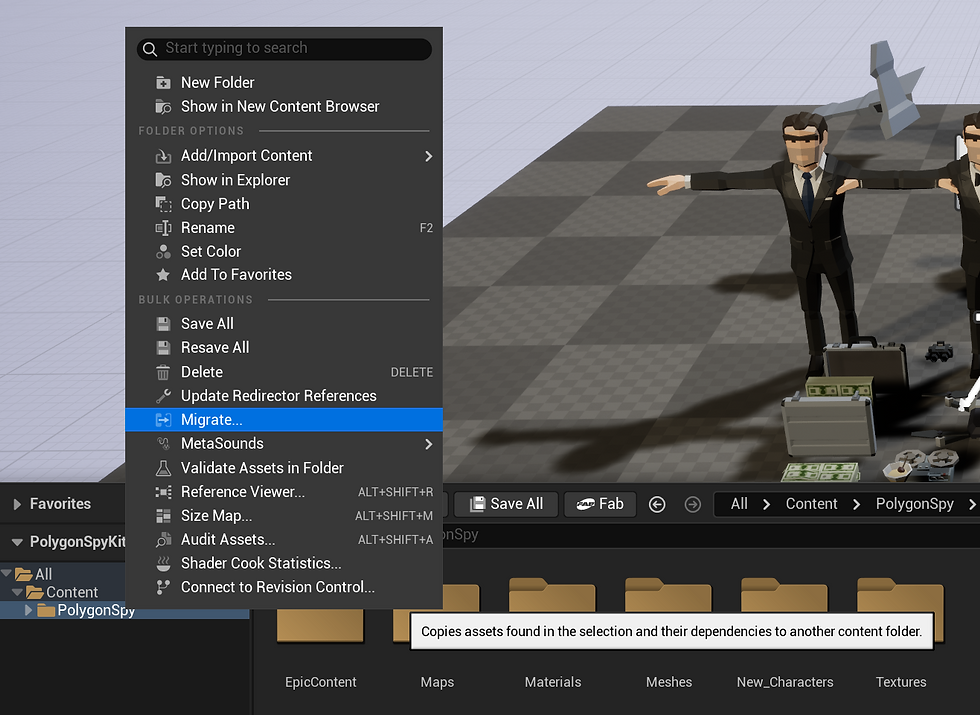
Here we can specify which of the assets we would like to specifically migrate or if we want to migrate all the files then we can just press OK.

Now we want to navigate to where we store our Unreal Engine projects, find the project that you want to move (copy) the assets to, then locate the content folder within that project.

You are all set; you can close the open project and enjoy your new Synty assets. You can do this as many times as you want with any Synty Store assets using the same process, unless you are importing animation files then follow the steps below.
Import & Set Up the Test Dummy for Animations
Navigate to your content browser and in the "Characters" folder create a "Synty" folder, and within that let's create a specific folder for our character model that we will be using which is the "Test Dummy" character.
Navigate to your downloaded Animation Pack, which in this case is the Synty Base Locomotion Animations and open the Character folder. Inside the character folder we are going to select the "PolygonSyntyCharacter.fbx" file and drag and drop it into our "Test Dummy" folder.
Now let's navigate back to the downloaded Locomotion Animations and open the "Demo Textures" folder. Here we can select the Polygon Dummy texture and drag and drop it into our content browser with the other imported assets.
Open the "M_Costume" material and delete the nodes to the left of M_Costume. Drag and drop the Polygon Dummy texture into the Material Graph and connect the RGB of the Texture Sample to the Base Color of the M_Costume. Now Apply and Save the material.

You'll notice that if you hover over the preview of the Character assets it will refresh with the updated Material.
Import Base Locomotion Animations
Open your content browser and create a new folder within your content folder named "Animations". Now create another folder within that named "Synty". The reason I insist on creating specific folders like this is for organization, especially as this is supposed to act as a base to your project so as you add more content you want to ensure that your project stays organized.
Navigate to the Animations > Polygon folder in the downloaded assets, then drag and drop the animations folder into the Animations > Synty folder we created in our content browser. I suggest matching the Animations with a Corresponding Master folder, for example if you are importing the Animation Pack - Locomotion, then we should have a Locomotion folder within our Synty folder where we can store our Masculine, Feminine, and Neutral Animation Folders.
You are going to see an import menu pop-up, you want to ensure that in the "Common Skeletal Meshes and Animations" section you select the Synty skeleton we imported with our Test Dummy Character.

Now we are all done importing assets into our project.
Comments