Adding Crouching and a Walk/Run Toggle to our Third Person Character in Unreal Engine
- Watchman

- Jul 25, 2025
- 9 min read
Updated: Aug 12, 2025
Creating an Input Action for our Walk / Run Toggle
Continuing from where we left off, our character currently has two states. Standing Still (Idle) and Running or Jogging. What we want to achieve is to allow our character to be able to switch between walking and running.
So, the first thing we need to do is great an input action. An input action is essentially a key input that allows our blueprint to execute a specific action. Open our content browser and find Content > ThirdPerson > Input > Actions. Here we can right click and find Input then we can create an Input Action. Let's name this IA_WalkRunToggle which stands for Input Action Walk Run Toggle.
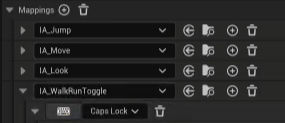
Now go back to our Input folder and open our Input Mapping Context (IMC_Default). Here we will create a new mapping for our new input action and set the action key to Caps Lock.
Creating Walk / Run Toggle in Blueprint
Navigate to your BP_ThirdPerson Character which should be located in Content > ThirdPerson > Blueprints. From here in the event graph we are going to right click and search for "IA_WalkRunToggle"
Before we start working on the blueprint string for our Walk/Run Toggle we need to create two Boolean variables. Boolean variables are variables that store information as two different possibilities, either True or False. In this instance what we want to do is create two Booleans that tell the engine if we are currently walking and if we are currently running which we can name "Is Running?" and "Is Walking?" Let's compile and then set the default value of "Is Running?" to True
Now from our Started Execution we are going to create a branch with the condition of "Is Running?". If the condition is true, then we are going to get our Character Movement Component and set our Max Walk Speed to 200. Then we are going to set our "Is Running?" to false and our "Is Walking?" to true. We can highlight that and use Ctrl+D to duplicate that and make some slight adjustments for the false output. There we can set the Max Walk Speed back to 375 and flip the values for our Booleans.
Now we can highlight our blueprint string and press C. This will create a comment box around our work so that we can name and organize it appropriately. Let's title this Walk / Run Toggle Action.

Adjust our BS_Locomotion to add Walking Animations
Now that we have the ability to change our Character's Movespeed, we need to have our animations be able to showcase that. So, navigate to our BS_Locomotion from the last tutorial and we want to search for our walk animations in the asset browser. We want to follow the same order as the Run / Jog animations this time though we are using the Walk animations in place of the Run animations. We are going to place these animations between our 375 grid line and our 0 grid line.
Now turn off our Vertical Snap to Grid feature and click on our animations one by one and set their vertical axis value to 200 instead of the snap to grid 187.5 so it matches our walking movement speed.

Creating an Input Action for our Crouch Toggle
Just like before what we want to do is create an input action, and let's place this one like the last one in our Content > ThirdPerson > Input > Actions folder. Then we will add it to our IMC_Default and bind it to the LftCtrl key.
Setting up our Crouch Toggle in our Third Person Blueprint
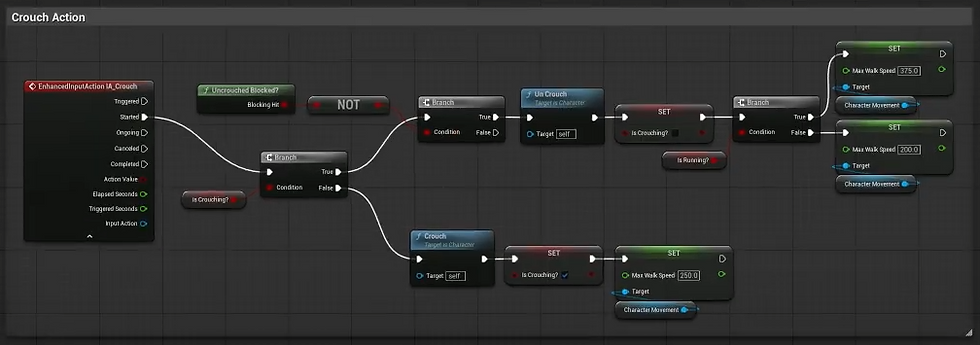
Find some space in our blueprint and right click then search for "IA_Crouch". We are going to drag from our started execution and create a branch. The condition of our branch is going to be a new Boolean variable named "Is Crouching?". This should keep track if our character is currently crouching. From our branch, if it is true we want to create another branch then search for "Uncrouch" if both branches are true. If our first branch is false, then we want to search for "Crouch". The Crouch and Uncrouch functions are prebuilt by default so you can just search for them.
The reason we have two branches for our Uncrouch is so that we can check to see if there is anything blocking us from being able to uncrouch. The condition is that if there is nothing that would block us, or should block us from uncrouching then we would perform an uncrouch action.

Check If Player can Uncrouch Function
We are going to create a new function by clicking the plus icon next to functions on the left side of the window. We can name this Uncrouched Blocked? Here we are going to drag from our function execution and find "Capsule Trace by Channel" then drag from that and place a return node. From our Capsule Trace "Out Hit" search for "Break Hit Result" and take our blocking hit and drag that into our Return node.
Now let's start to fill in the information for our Capsule Trace. We are going to right click and search for "Get Owner" then from that "Get Actor Location". Our Actor location is going to be our start point for the trace. We can drag out from the Actor location again and find the "Add" node. Right click and split the pin, then change the Z value to 96, which is the height of the actor. That result is going to be our end point.
Now drag the Capsule Component from the Actor Components into the graph and from it find the Capsule Radius. That is going to be the radius value for the trace. Lastly, select our return node and make this a pure function. What this function does, is when executed it will check to see if there is anything that blocks the actor capsule component from the ground to the player's standing height, and if there is something blocking the character then it will return as true.

Now we can return to our Crouch Action and add our new function followed by a Not Boolean and use that as the condition of our second branch.
The last few things that we need to do for this blueprint is to set our "Is Crouching?" after our Crouch and Uncrouch respectively, then change our movement speed. If we are crouching, we can set our movespeed to 250, and if we are uncrouching then we need to determine if we were walking or running when we crouched. This is going to be checked through a branch with our condition being "Is Running?". If it is true then we will return our Max Walk Speed to 375, and if not then we can set it to 200. To keep things organized let's highlight and comment this blueprint string and name it Crouch Action.
Now that we have crouching implemented what we need to do is think about it wholistically in our character, which means how does this new implementation affect other existing actions and what steps do I need to take if any to make sure that the player interacts how I want them to within the game. That being said we have the ability to jump and the ability to toggle our walk and run speed, both of which we should not be able to do when we are crouching.
So moving back to our Walk / Run Toggle after the Started execution from the Input Action we want to create a branch before we get to our blueprint string. Our condition for this branch is going to be our "Is Crouching?" Boolean, and we want our false output to be our blueprint string for our Walk / Run Toggle mechanic. Another way to do this is to create a NOT Boolean from our "Is Crouching?" Boolean and set our blueprint string as the true output.
The two different ways we can describe this is that, one, We are checking to see if our player is crouching and it that is false then we can toggle, and two We are checking to see if our player is not crouching and if that is true then we can toggle.
We also want to add this same branch and condition after the Started execution for our jump.
Updating the Animation Blueprint Event Graph
Now that we have set up an input action and Boolean to track our crouching in our third person character blueprint we need to be able to access that. Once you navigate to your AB_Synty Animation Blueprint then you can right click and search for Event Blueprint Initialize Animation. What this node does is execute when you start playing the game.
From that find "Cast to BP_ThirdPersonCharacter", for your input you can use "Try Get Pawn Owner" then for the result you can promote that to a variable. This variable is an actor variable and that will keep track of our Third Person Character and allow us to reference it. We can highlight and comment this and name it Establish Reference.

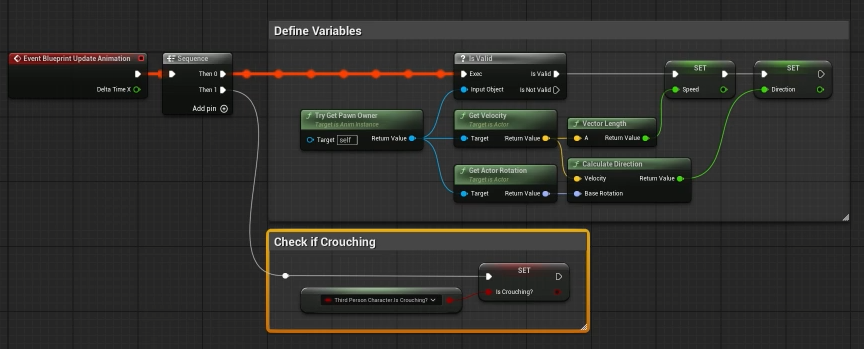
Find space below our Speed and Direction variables, right click, and find "Property Access" from here let's expand our Third Person Character variable (our actor reference) and look for our "Is Crouching?" variable that we set up earlier. Then let's promote that to a variable that we can keep track of within our Animation Blueprint.
Now we want to add a sequence node after our update animation, this tells our game to do event 1 then event 2. So our first event is going to be defining our variables. Our second event is going to be determining our "Is Crouching?" Boolean.
Now head into our Locomotion State machine and we want to create a new state, which we can name "Crouch Transition". From here we want to create to transitions, one from Idle to our new state, and one from Locomotion to our new state.
Let's create another state, named Crouched, and we need to create a transition from our Crouch Transition state to our Crouch state.
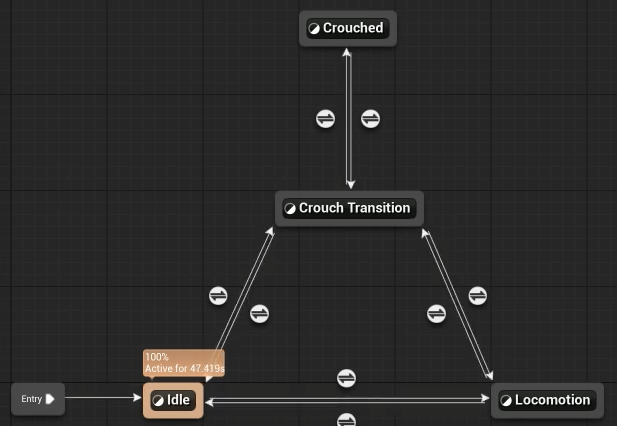
Now that we have our states, we need to set transition rules for the transitions we created. For both transitions going to our Crouch Transition, we want to get our "Is Crouching?" Boolean and set that as the condition for the rule. We also want to set the same condition as the transition from the Crouch Transition State to Crouch State.
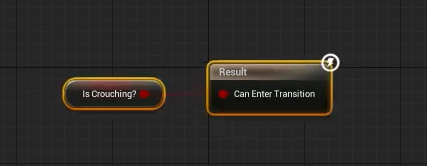
For our transitions moving from our Crouch State to our Crouch Transition state we want to grab our "Is Crouching?" Boolean and drag from it and get a NOT Boolean and then place that into the transition rule.
For our transitions from the Crouch Transition, we are going to essentially do the same thing except from the NOT Boolean we are going to get an and Boolean. For our transition to the Idle state we want to set our second condition using our speed variable and from that get "Nearly Equal (Float)" and set B as 0, and our error tolerance as 0.1. So if we are not crouching and our speed is nearly 0 then we should be in our Idle State.

Our transition rule condition for moving from our Crouch Transition to our Locomotion state is going to roughly be the same, but instead of having our second condition be checking to see if our speed is nearly equal to zero, we are going to be checking our speed to see if it is greater than 0.1.

Now that we have our states created and our transitions set, we need to go into our new states and set up our animations. For this we can start with our crouch transition. Within our crouch transition state we are going to right click and search for "Blend Poses by bool" This node allows us to blend between two poses based on a Boolean variable. If the Boolean return true then we use pose A and if it returns false then we use pose B. We can also set the time allowed for it to blend between the poses.
You can guess that the variable that we will be using is going to be our "Is Crouching?" Boolean so we can get that and set it as the active value of the node. In our Asset Browser we can find our Crouching animation (A_Idle_Crouching_Masc) and our Idle Standing Animation (A_Idle_Standing_Masc) and connect them into our node respectively. If our "Is Crouching?" Boolean returns true we want to Crouch, and if it returns false we want to stand.

Now the only thing that is left is to set up our Crouch State. So, to do that we are going to be using a blendspace just like we did for our Locomotion State. We can actually navigate to our Content > Animations > Synty > AB_Synty folder and right click and duplicate our "BS_Locomotion" blendspace. Name this BS_Crouched.
Open up the new blendspace and inside in the Asset Details we can scroll down to blend samples and clear the graph by clicking the trashcan icon. Next we need to adjust some values in the vertical axis, so let;s set our max speed to 250 and our grid divisions to 1.
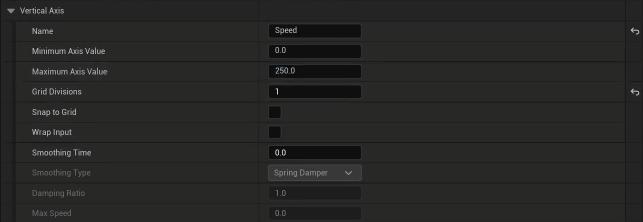
For our blendspace graph, just like the last blendspace, we are going to place our idle animation along the bottom of the graph. This should be your (A_Idle_Crouching_Masc) animation. Then just as before we are going to use our forward animation in the center then move counterclockwise in direction to the left and clockwise to the right. Save and head back to our Locomotion state machine.

Now we can drag our BS_Crouched from the asset browser into our Crouched State and then like we did for our BS_Locomotion get our speed and direction variables and set them for our blendspace.
From here we should have working walking, running, and crouched animations in addition to the ability to toggle between walking and running, as well as the ability to toggle between standing and crouching.
If you would like to follow the Step-by-Step Tutorial, Check out the Video Below!

Comments