Setting up Basic Locomotion Animations for a Third Person Character in Unreal Engine
- Watchman

- Jul 23, 2025
- 7 min read
Updated: Aug 12, 2025
Let's start fresh with a Third Person Template project.
Import & Set Up the Test Dummy
Navigate to your content browser and in the "Characters" folder create a "Synty" folder, and within that let's create a specific folder for our character model that we will be using which is the "Test Dummy" character.
Navigate to your downloaded Animation Pack, which in this case is the Synty Base Locomotion Animations and open the Character folder. Inside the character folder we are going to select the "PolygonSyntyCharacter.fbx" file and drag and drop it into our "Test Dummy" folder.
Now let's navigate back to the downloaded Locomotion Animations and open the "Demo Textures" folder. Here we can select the Polygon Dummy texture and drag and drop it into our content browser with the other imported assets.
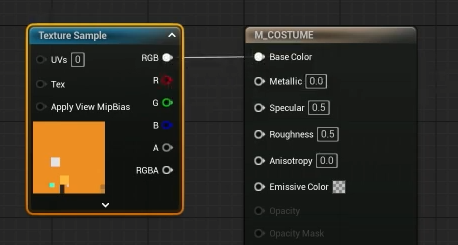
Open the "M_Costume" material and delete the nodes to the left of M_Costume. Drag and drop the Polygon Dummy texture into the Material Graph and connect the RGB of the Texture Sample to the Base Color of the M_Costume. Now Apply and Save the material.
You'll notice that if you hover over the preview of the Character assets it will refresh with the updated Material.
Import Base Locomotion Animations
Open your content browser and create a new folder within your content folder named "Animations". Now create another folder within that named "Synty". The reason I insist on creating specific folders like this is for organization, especially as this is supposed to act as a base to your project so as you add more content you want to ensure that your project stays organized.
Navigate to the Animations > Polygon folder in the downloaded assets, then drag and drop the "Masculine" folder into the Animations > Synty folder we created in our content browser, since in this tutorial we are going to be making a male character, but it would work the same way with a different character just different assets.
You are going to see an import menu pop-up, you want to ensure that in the "Common Skeletal Meshes and Animations" section you select the Synty skeleton we imported with our Test Dummy Character.

Now we are all done importing assets into our project.
Create Animation Blueprint and Define Event Graph Variables
We are going to be moving on to creating an Animation Blueprint now, but we'll need somewhere to store it to keep everything organized, so let's create another folder and name it "AB Synty" within our Animation > Synty Folder. AB stands for Animation Blueprint. Now let's open our new folder and right click then front the animation tab in the menu, then Animation Blueprint.
Here we can see another pop-up window and we want to select our Synty Skeleton (PolygonSyntyCharacter_Skeleton). We are going to name this "AB_Synty" just like the folder.
The first thing you will see is our Output Pose node, and since nothing is connected to our output pose we aren't actively animating our character. We can fix this by taking an animation and connecting it to the output pose but since we want to play multiple animations we are going to use a state machine to help the engine decide what animation we should be using. So we can right click and search for State Machine. Let's name the state machine Locomotion and then connect it to our output pose.
Before we start working on our State Machine, we need to establish some variables to help our State Machine know when to switch animations. So let's head to our Event Graph.
Here what we want to do first is check to see if any character is using the Animation Blueprint since they will be where we are pulling our variables from. So right click and find the Is Valid node, which should be the one with the question mark.
Now we are going to connect the execution of the Event Blueprint Update Animation into the Is Valid and get the Try get Pawn Owner and connect that to the Input Object.
From the Try Get Pawn Owner we are going to drag out and search for "Get Velocity" since we are looking for the movement of the character. The output of that is a Vector which is a variable that contains information for X, Y, and Z Axis, but we want to simplify that into a single numeral value like a Float variable, so we need to drag from our "Get Velocity" and search for "Vector Length". We can then promote the Return Value of our "Vector Length" and name it Speed.

All this means is that we are checking to see if there is an actor using the animation blueprint, and if there is we are going to check to see how fast that actor is moving.
Now what we want to do is drag from our "Try Get Pawn Owner" node again and search for "Get Actor Rotation" from there we can drag off and search for "Calculate Direction". On the Calculate Direction node you will see two inputs, one of which is the Base Rotation which we are deriving from the Actor's Rotation and the other is Velocity which we can get from the "Get Velocity" node we created which is pulling information form the same actor. Now we can promote the result and name it Direction.

Build the State Machine
Let's go back to our Animation Graph and open our State Machine. Inside we can drag from our Entry and create a new state named "Idle". We can open it up and on the right side of the window you will see the asset browser which shows available animations from the skeleton that we selected when we created the Animation Blueprint. Here we can find "Idle_Standing_Masc" and drag it into our Graph. This will create a sequence player which plays that animation. Let's connect it into our Output Animation Pose and then in the details we can Loop Animation.
Now we can return back to the Locomotion State Machine and drag from Idle and create another state, which we can call Locomotion. So here we have to tell the game when we want to change from the Idle state to our Locomotion state, and we want this change to be due to our character moving. So, we can open our transition and grab our speed variable. You can use the Ctrl+Drag to create a "Get Variable" node and use the Alt+Drag to create a "Set Variable" node. So we want to get our speed variable then drag from it to search for greater than 0. This means that on the condition that our characters speed which we defined earlier is greater than zero then we will transition to the Locomotion State from the Idle state.

So now that we can transition from our Idle to Locomotion states, we want to be able to transition from Locomotion back to Idle. So we want to drag from the border of our Locomotion State into the Idle state then open the transition. Here we want to get our speed and check if it is Nearly Equal to 0, which is essentially not moving, and put that into our result. And we can set an Error Tolerance to 0.1.

Creating a Blendspace
Open the content browser and in our Animations > Synty > AB_Synty folder we are going to right click, then in the animation menu, select Blend Space. Wea re going to use our Synty Skeleton that we have been using and name this "BS_Locomotion" for Blend Space Locomotion.
Let's open it up and start filling in the Asset Details on the left of the window. Our Axis are going to be the variables that we defined for our character in the Event Graph of the Animation Blueprint (Speed and Direction).
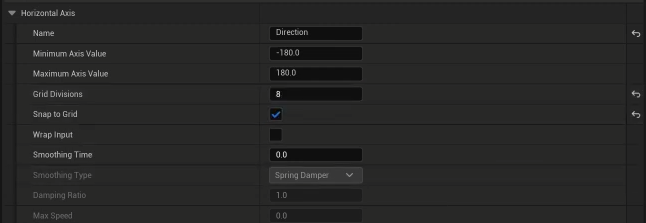
So, in the Horizontal Axis name we are going to use Direction. Our minimum axis value is going to be -180 and our maximum axis value is going to be 180. Our grid divisions is going to be 8, and we are going to enable snap to grid.
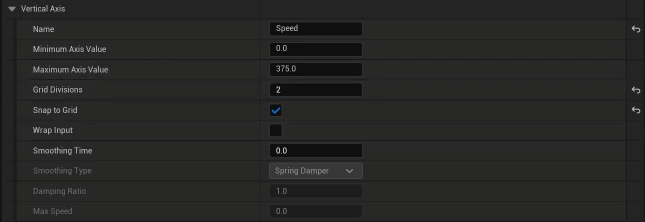
Our Vertical Axis name is going to be Speed. Our minimum axis value is going to be 0 and our maximum axis value is going to be 375. I am using 375 as our jogging character speed because I believe that it best fits the animations, but you can use whatever speed you prefer. Our grid divisions is going to be 2, and we are going to enable snap to grid.
In the Sample Smoothing section we want to set the Weight Speed at 7 for Smooth Blending.

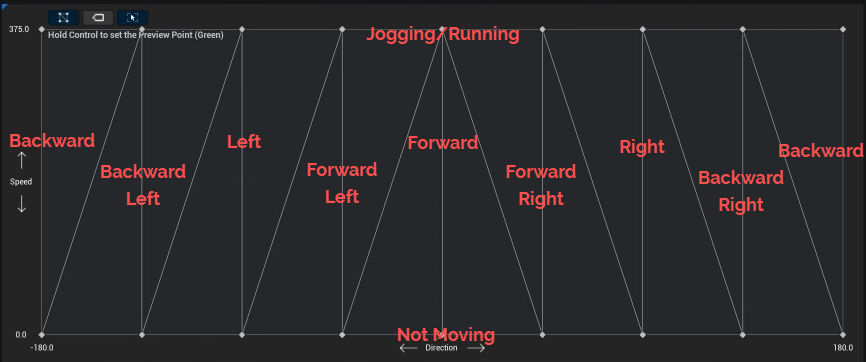
Now we are going to start working on our blendspace graph. Here we can grab the "Idle_Standing_Masc" animation from the Asset Browser and place it along the entire bottom line since it doesn't matter what direction we are facing if our speed is 0 then we are going to be in the idle animation.
Now we are going to search "Run" in our asset browser to locate our "Run_FwdStrafeF_Masc" and we are going to place that in the center top of our blendspace graph. This means Run Animation, Forward Movement, Forward Direction, Masculine Character. So, as we move left, we are going to search for "Run_FwdStrafeFL_Masc" and then "Run_FwdStrafeL_Masc" as our direction is gradually moving from Forward, to Forwards Left to Left.
Now to the Left of that we are going to start shifting to "Run_BckStrafeBL_Masc" then "Run_BckStrafeB_Masc" since our direction is continuing to adjust counterclockwise.
Once we return back in the forward direction, we can set our movement animations to the right using the same naming convention just the right variants instead of the left. You should end up with this.
Now save our blendspace and return to our Locomotion State inside of our State Machine. Here we can drag and drop our blendspace, which should now appear in our Asset Browser, into our Graph. Let's get our Speed and Direction variables from earlier and we can connect the output of the blendspace into the Output Animation Pose.

Adjusting the Third Person Character
We want to navigate to our Third Person Character which can be found in Content > Third Person > Blueprints. It will be called BP_ThirdPersonCharacter.
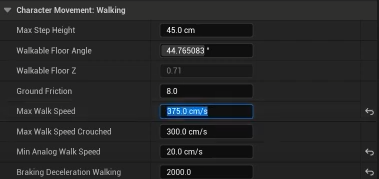
We are going to open up our character movement component on the top right and it's details should appear on the left of the window. In the details we are going to look for Max Walk Speed and adjust it from 500 to 375, to match our animations.
Now just above character movement we can find our Mesh Component for our character. Opening the details for that we want to look for Skeletal Mesh Asset and change that to our PolygonSyntyCharacter. Then above that we want to change our Anim Class to the AB_Synty that we created.

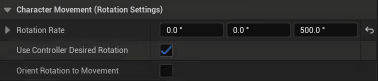
The last thing we are going to change is the Character Movement rotation setting back inside the Character Movement Component, and here we are going to set the Orient Rotation to Movement as false and Use Controller Desired Rotation to true.
If you would like to follow the Step-by-Step Tutorial, Check out the Video Below!

Comments